
Mastering Stripe: Subscription Upgrades and Downgrades (Part 1)
A Practical Guide to Proration and SaaS Pricing Models

When I started implementing the new pricing model for our application, I was shocked to see how little content was there about upgrading and downgrading using Stripe. I felt there was no copy/paste playbook out there that could be used for SaaS software without thinking much. This might seem like an easy topic but once you get into the weeds, it requires a bit of playing around with things to understand.
After spending a week of changing, fixing, testing, and retesting this is how you can easily implement upgrading and downgrading using Stripe in Python. Even if you don’t use Python I think the knowledge of how to implement this using Stripe will help implement any SaaS pricing quickly. This article simply gives you the logic and pointers on how an upgrade or downgrade can be done using Stripe.
Let’s understand the pricing model we are gonna use for this demo
There are 3 pricing models, each with a monthly/yearly option.

Users can take four actions: New, upgrade, downgrade, and cancel.
New subscription: This is when the user subscribes for the first time
Upgrade subscription: This is when the user chooses to move from a low-tier to a high-tier package.
Downgrade subscription: This is when the user doesn’t want to continue the high-tier package and chooses a low-tier package from the next billing cycle onwards.
Cancel subscription: This is when the user no longer needs the service.

To start a new subscription, a Stripe Checkout session can be created either directly in the front end or through the backend. Typically, the frontend calls the backend to generate a session ID. Once the backend returns the session ID, the frontend uses it to render the Stripe Checkout page.
Stripe Journey of Ramu

Let’s say Ramu subscribes for the first time and goes with the 2nd pricing package (Professional Standard) with a monthly option that costs $50. As usual stripe checkout page opens, user pays the amount, once the payment is successful stripe sends a webhook to the backend API, and the backend API captures this webhook and changes the values in the database.
Now the user after a couple of days wants to upgrade to a new high-tier package. The user wants to switch to the 4th tier package (Institutional and Research) with a monthly tier which costs $250. If the user had to pay $250 again after paying $50 a few days back, that means the user is paying $300 in total for getting the same features as the $250 package. So this doesn’t make sense.
This is where the “proration“ comes in. Basically, it subtracts the remaining unused amount of the previous package from the cost new package.
Enough is enough. Its implementation time. When the user clicks the top tier package, this is what we show in the front end. Since the user has already paid $50, the user has to pay an extra $200 to upgrade to the 4th tier package on the same day. This is called proration. We can get the prorated amount using the stripe package but it’s not exactly crystal clear on what needs to be done.
When the user clicks to upgrade to the 4th tier, a backend API is called to get the prorated amount shown above. You should use the stripe.Invoice.upcoming() function in the image below to get the upcoming invoice which will have all the details about the prorated amount.

Now it becomes a bit confusing here. It’s not straightforward to calculate the prorated amount using the above response from the upcoming invoice function. I don’t want to go in-depth but if the upgrade is done in the same frequency i.e monthly to monthly or yearly to yearly, then you just sum all the amount where the proration is set to True in the response you get from the stripe upcoming invoice function above.
If the subscription frequency is different i.e monthly to yearly, the function sums up the amount for all line items where proration is marked false and true. These are the charges associated with the new package and the credits used in the old package. (If you need more details on this, please let me know I will explain this in the upcoming posts.)
In the front end, after calculating the prorated amount, the number is shown in the pop-up if the amount is positive. If not the user is downgrading as there is no extra amount to pay.
Now the user is aware of how much extra amount needs to be paid to upgrade. The user will click the button. Immediately the amount is deducted as the user already has an existing subscription.
Upgrade subscription
When the user clicks to confirm the extra amount that needs to be paid, an API is called to deduct the amount which is done using the code below where you are modifying the existing subscription. Now two things can happen in this API: upgrade and downgrade. Let’s see how to handle the upgrade.

What’s happening in the above code is we are updating the current subscription to the new subscription and changing the billing cycle to today. Also, proration behavior is set to create_prorations to prorate the new pricing package. This is all you need to do to upgrade the user.
Note: Make sure payment_behaviour parameter in the above code is set to error_if_incomplete as this would stop modifying the subscription if the payment fails. I can’t emphasize enough how important this is while modifying a user’s subscription.
Downgrade subscription:
When the prorated amount is less than or equal to zero, then the user is downgrading. So two things are done during the downgrade:
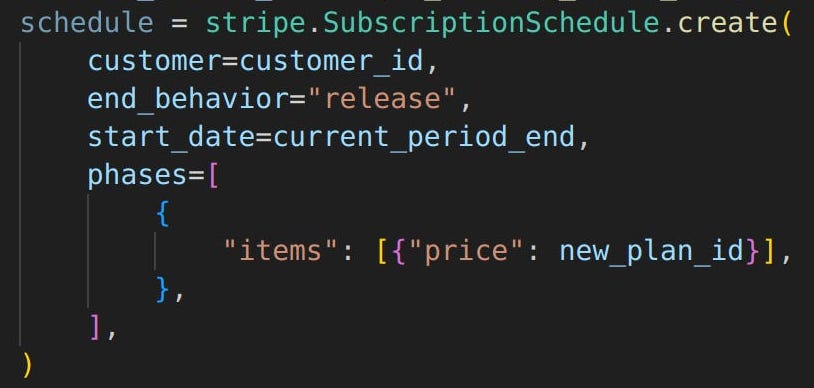
Cancelling the existing subscription at the end of its billing cycle

Scheduling a new subscription after the existing subscription ends.
That’s it for today! I will talk about other edge cases in Stripe in the upcoming posts. Thank you for reading.